
Sometimes people just come up with the best ideas…
As we approach the cold weather, Sonya Blackstone, of Blackstone Designs has come up with a great idea to pull over 1,000 crocheters (so far) together to make mittens for homeless and displaced people. Making a pair of mittens seems like a simple way to reach out to our fellow man but let me tell you something, when we all band together like this, a simple kind act can turn into thousands of loving gestures. Here are Sonya’s mittens from Week 1.
I’m all in! Sonya has asked me to contribute a free mitten pattern, along with several other designers. We are all going to be releasing our patterns week by week, and asking our readers and followers to crochet along with us. Get ready to be blessed with a slew of free patterns, enthusiastic giving and generous handmaking!
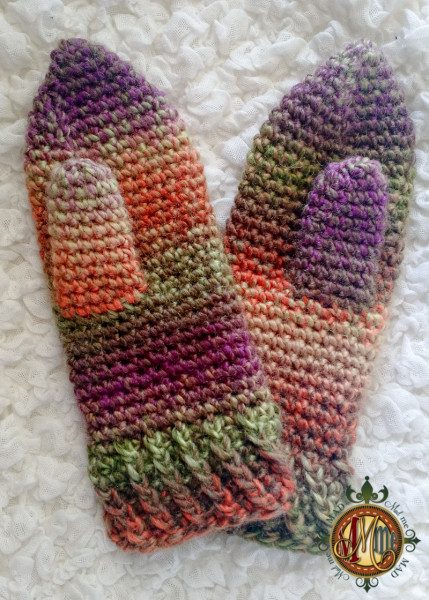
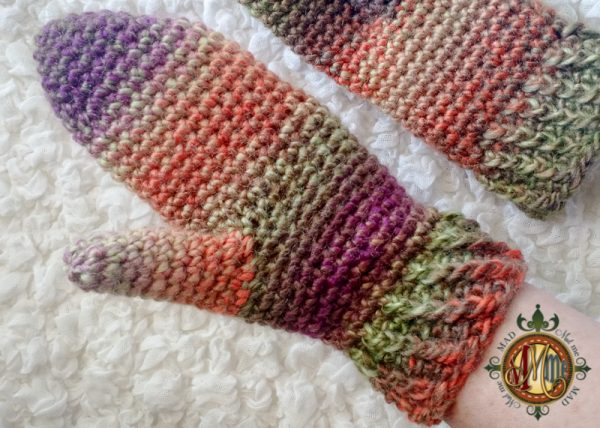
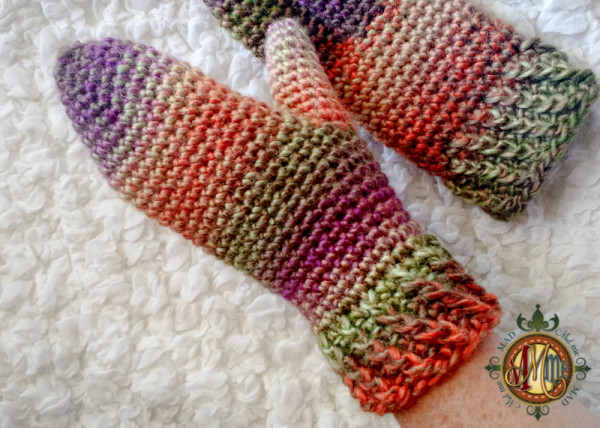
My mitten pattern is below, I’ll also make it available as a pdf on Ravelry today. This is my first pair of mittens ever! It was a treat to figure out the cuff, the thumb, the length, etc. and to do it for a wonderful cause. I’ll be making more posts about this pattern as well! I’ll walk through the each part in separate posts, with photos and more explanation for beginners.

TO ADJUST SIZE FOR A PERFECT FIT- I do not believe in a ‘one size fits all’ kind of world. So if you want to make these wider, taller, smaller, etc, use these tips make your adjustments:
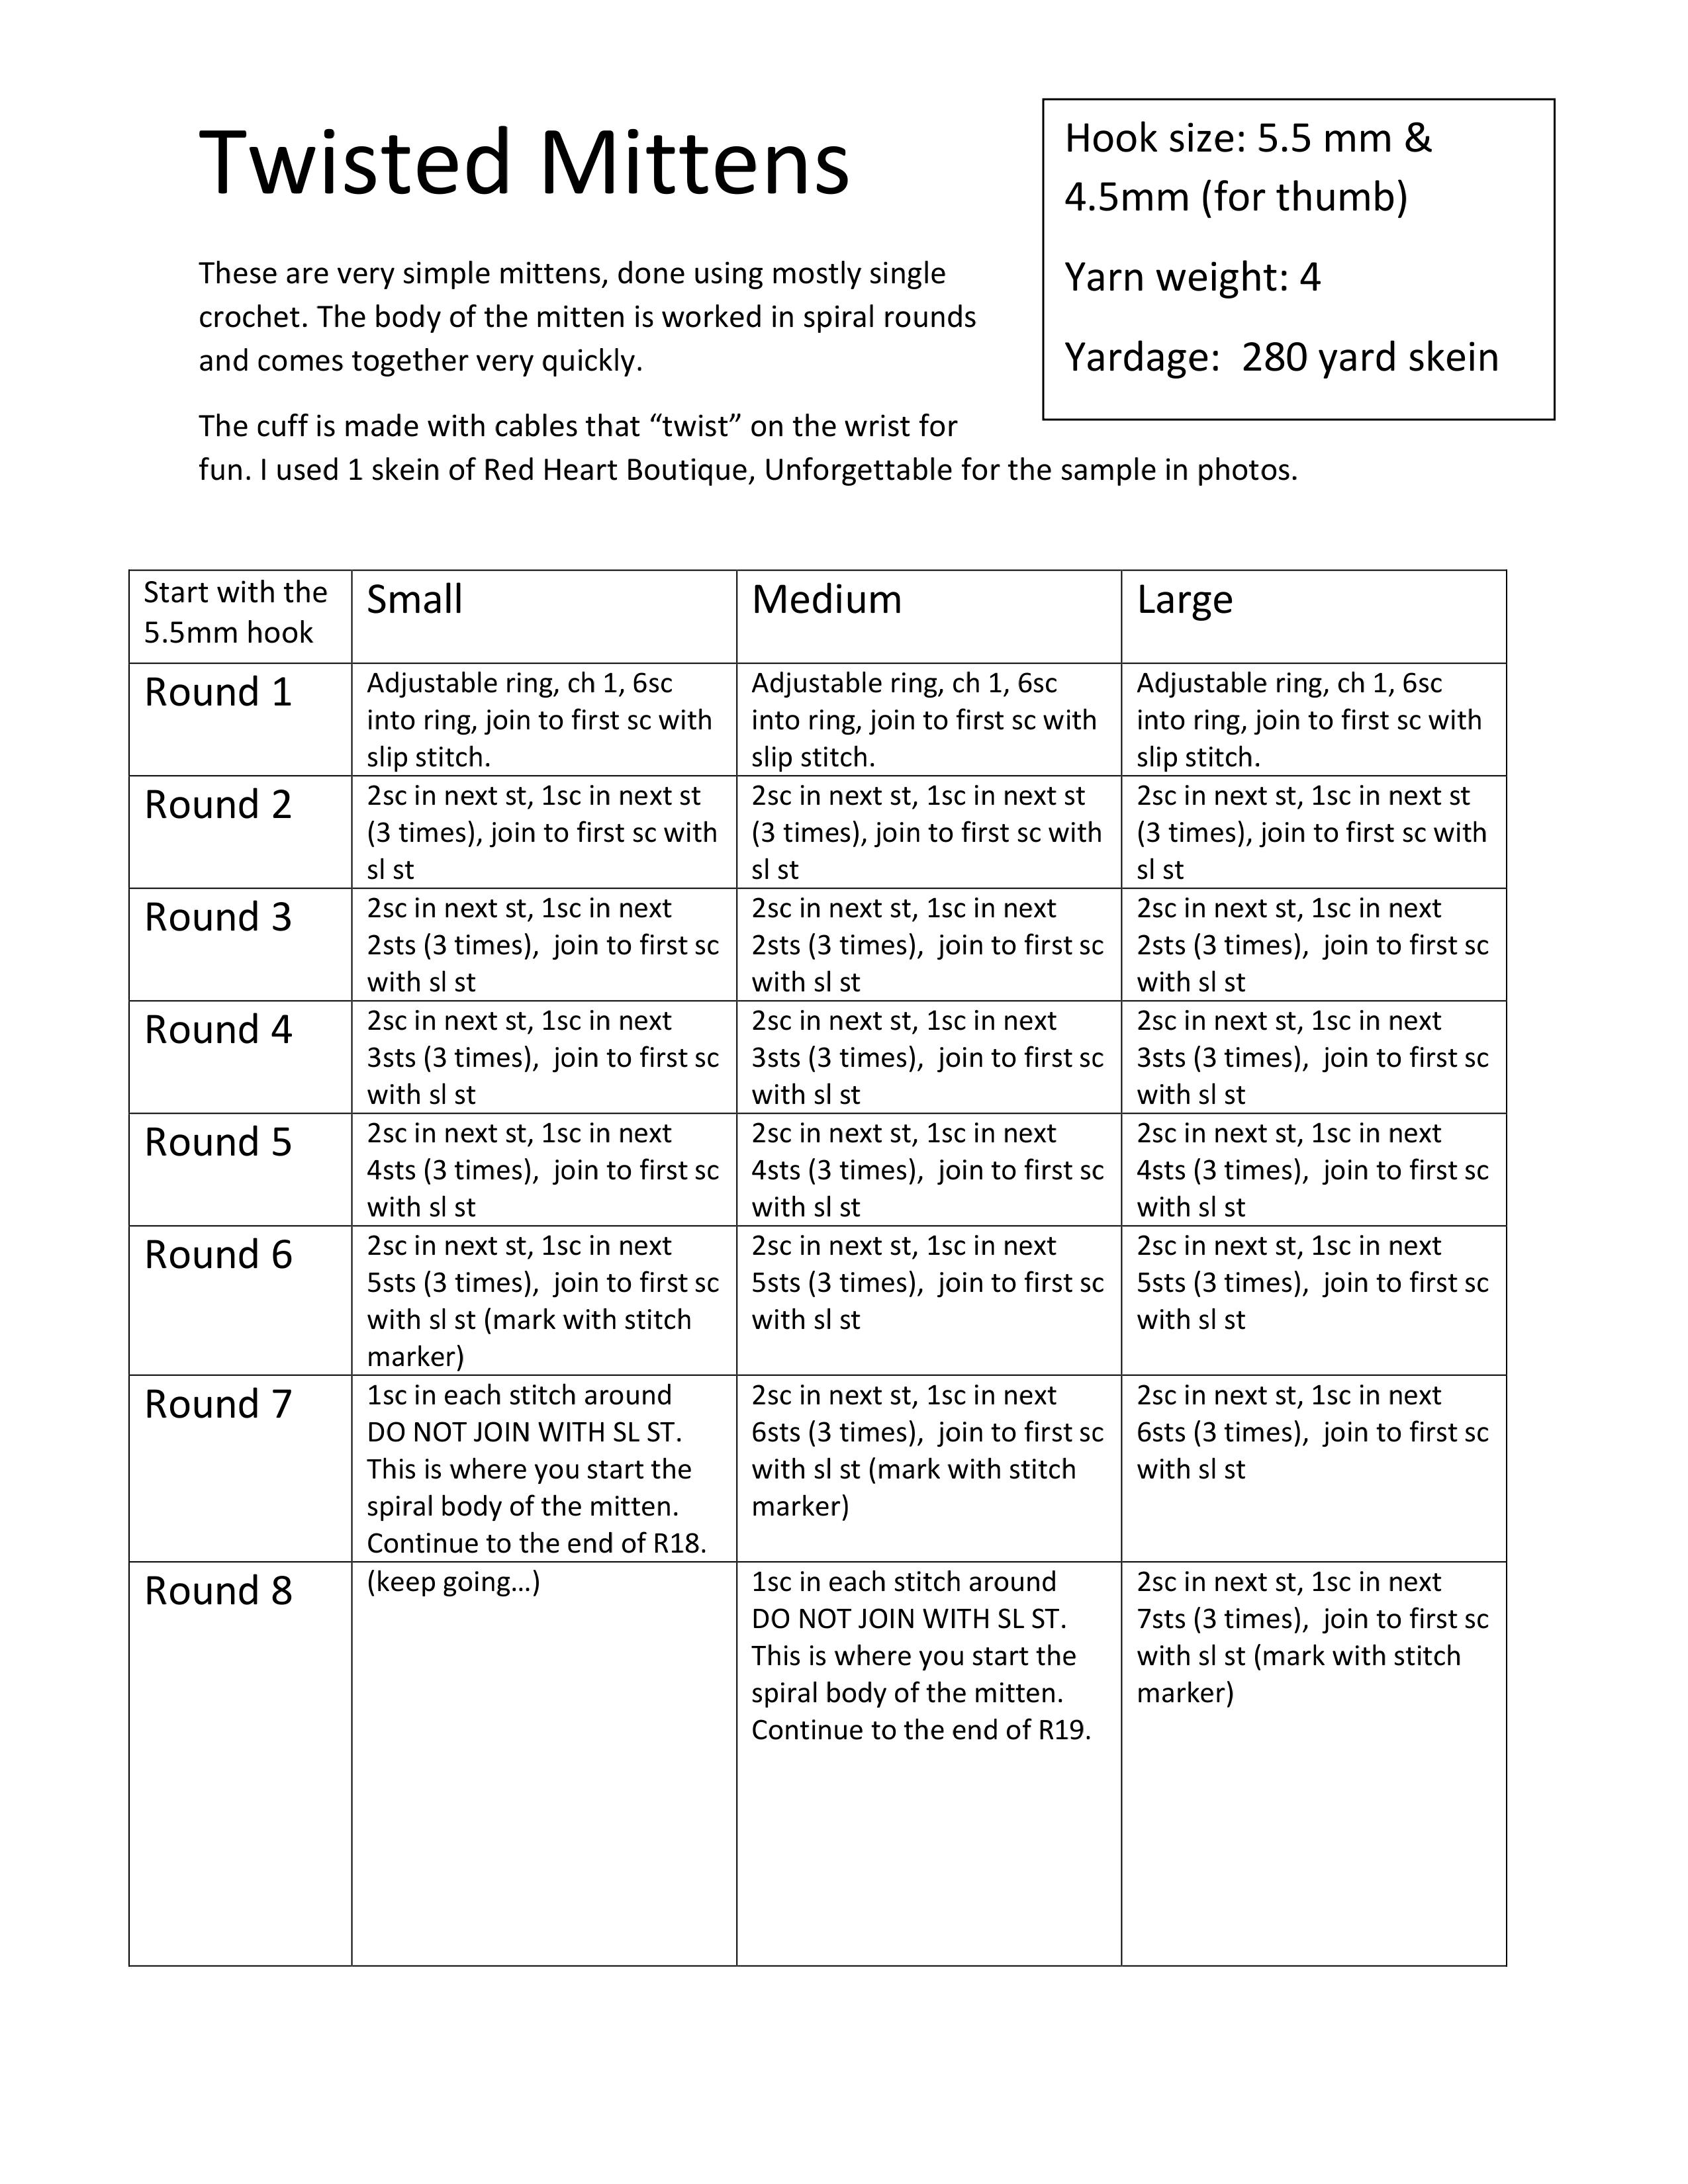
Wider- Width is determined by how many “increase” rounds you make. The increase rounds are rounds 1-6 for size small and rounds 1-7 for medium and rounds 1-8 for large. To make them even larger, continue increasing here.
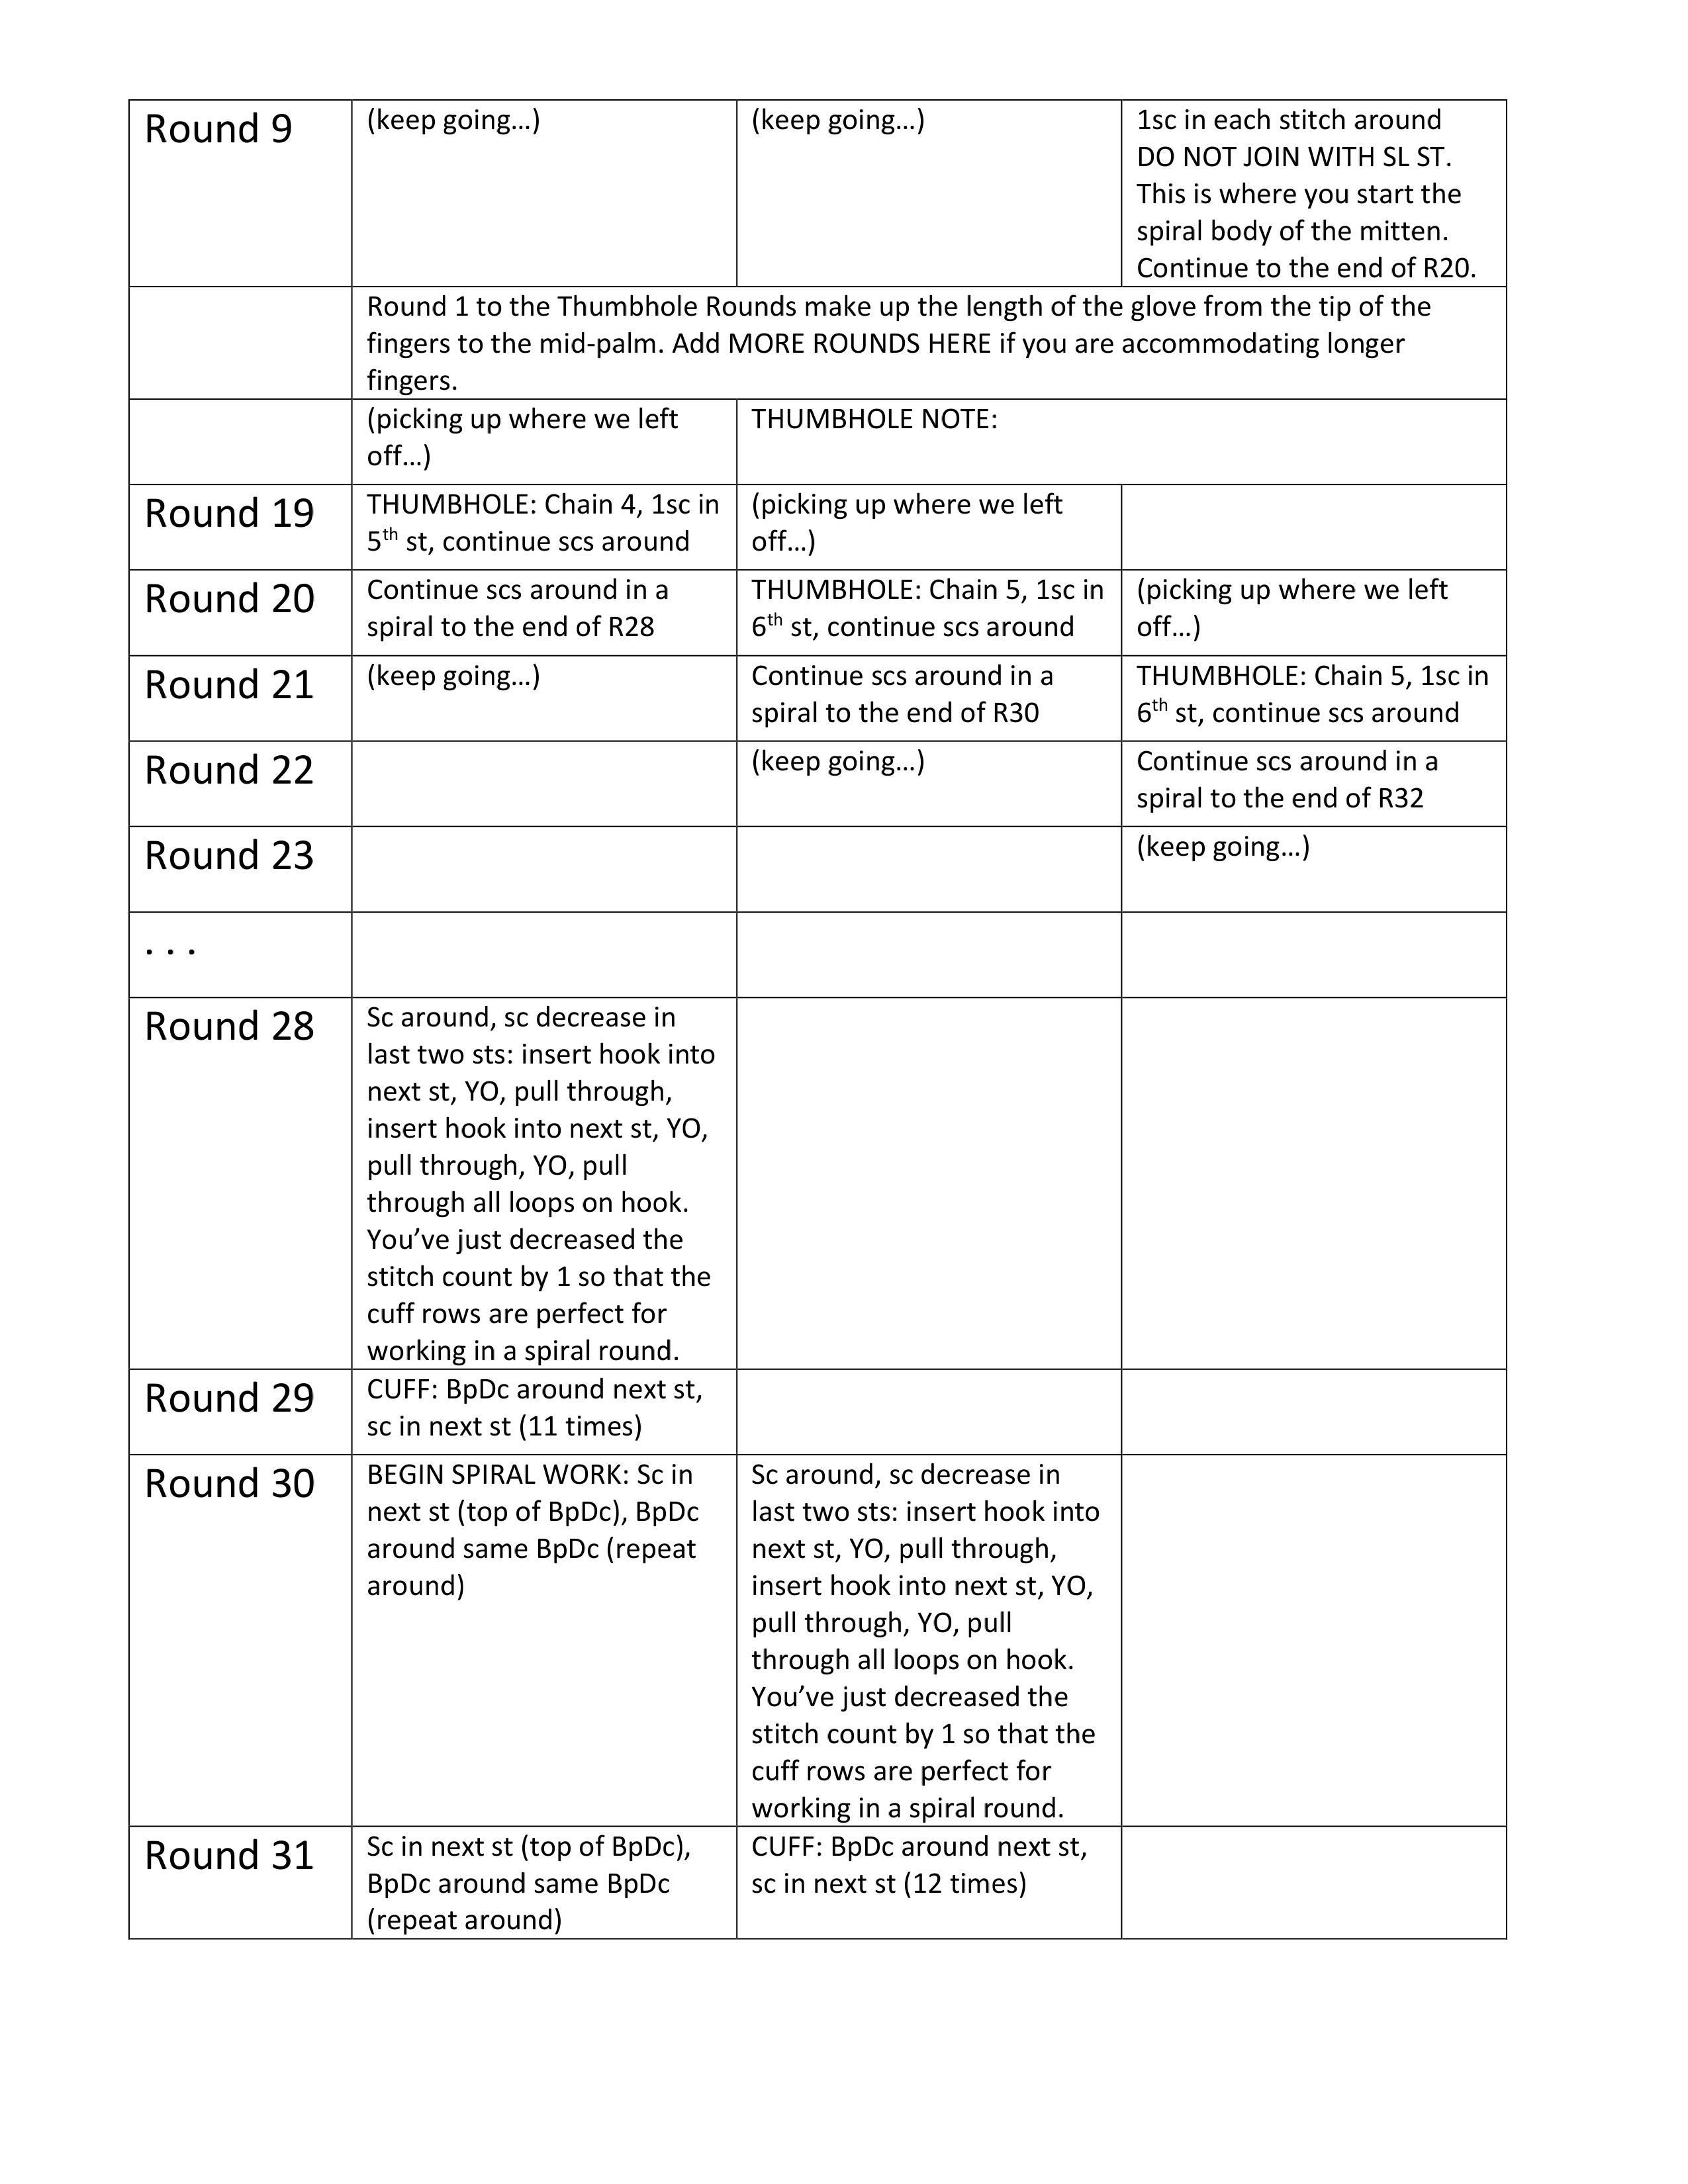
Fingers: The single crochet rounds after the increase rounds make up the main part of the finger and palm portion of the mitten (Rounds 7,8 or 9 through Rounds 19, 20 or 21 depending on the size you are working on). Add or remove Rounds here to make this section longer or shorter.
Palm of hand: The Rounds between the thumb hole and the cuff make up the palm of the mitten. Add or remove Rounds here to make this section longer or shorter.
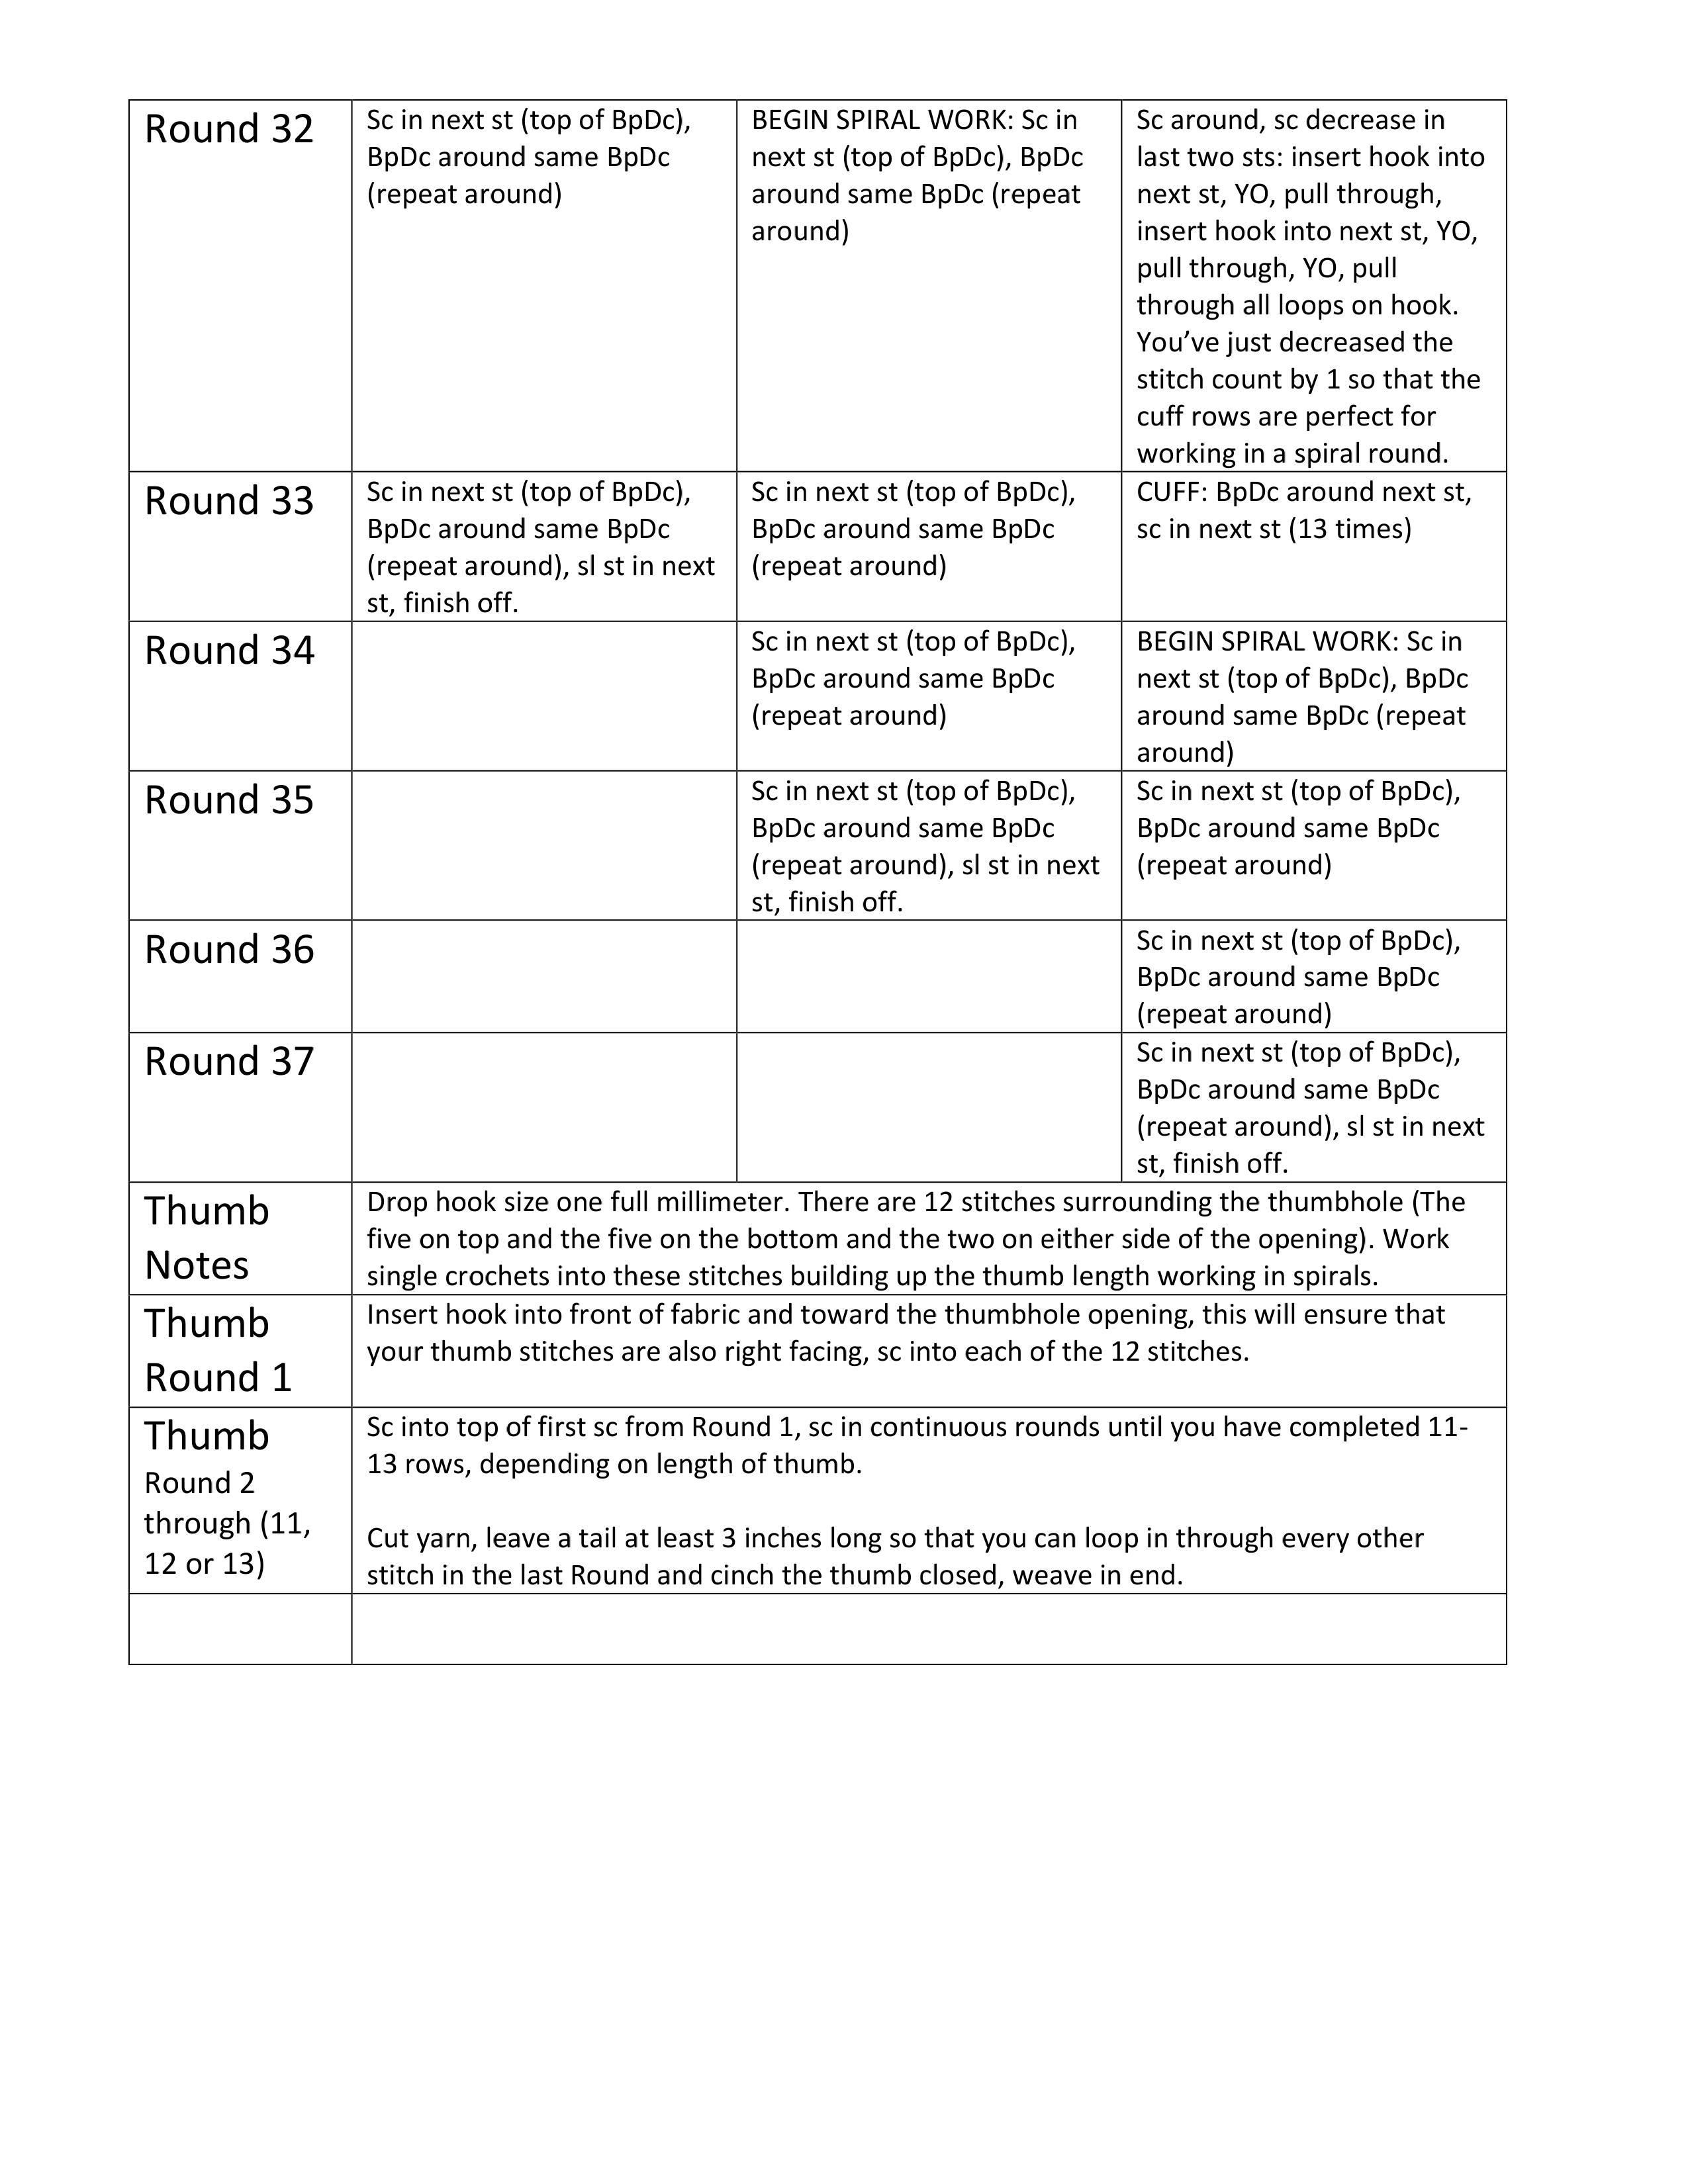
Cuff: Conceivably, the cuff can be made much longer if you desire, but you make have to increase the number of stitches to accommodate for the widening of the forearm.
Thumb: Add or remove Rounds to make the thumb longer or shorter.
CLICK HERE TO OPEN PDF Once the pdf page opens, you can print or save directly from the page by right clicking on the pdf.
THE DOWNLOAD HAS BEEN UPDATED WITH STITCH COUNTS THAT DO NOT SHOW ON THE IMAGES BELOW.
Subscribe and you will automatically be entered to win all MadMadme contests and giveaways and receive deeper than advertised discounts on new patterns and products.
[newsletter]
I’m having issues with the beginning of the pattern, I get confused at where the slip stitch should go and i think it’s messing up the number of stitches I get each row. Please help.
Hello Ariel, the slip stitch goes into the top loop of the first single crochet of the round. When working in a round, the top of your stitches is actually the loop that is above and slightly to the right of the stitch posts.
This is the first mitt I’m trying to crochet. I did fine til I get to where it says chain 5 for thumb. Then I’m lost. Can someone help me or is there I video for the twisted mitt. I think I’m ok with thre rest of the pattern just can’t figure out how to leave space for thumb. Ty in advance for any help anyone can give me. Oh I’m making the medium size for my grandson.
Hello Lynn, if you Google how to crochet a button hole or thumb hole, you will find tons of videos and photos for this process.
Week 1 pattern:
http://blackstonedesigns.blogspot.com/2015/09/chilly-cables-mittens.html?m=1
these are perfect. looking forward to the pdf. b.t.w-what yarn did you use?
Here’s the pdf link: https://madmadme.com/wp-content/uploads/2015/09/Mittens.pdf
Having trouble with cuff. Can you explain it in more detail?
Thanks Connie
What part of the cuff? I’d be happy to try to explain in better.
I found the listing on ravelry, but when you click on the “available for free”, it just takes you back to this blog. Will there still be a pdf download option?
Katie, thank you for you inquiry. I’ve added a pdf link to the post, here is the direct link. You can right click on the pdf and download it from there. https://madmadme.com/wp-content/uploads/2015/09/Mittens.pdf Enjoy!